Friday, January 28, 2022

Anemone Bead Necklace - free pattern

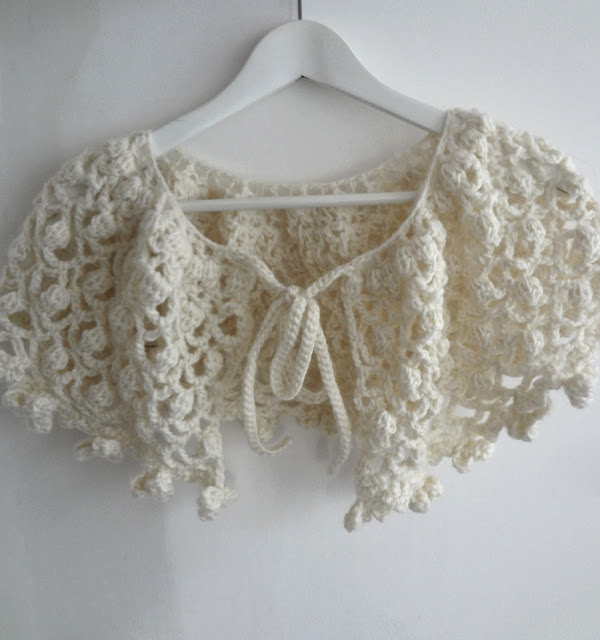
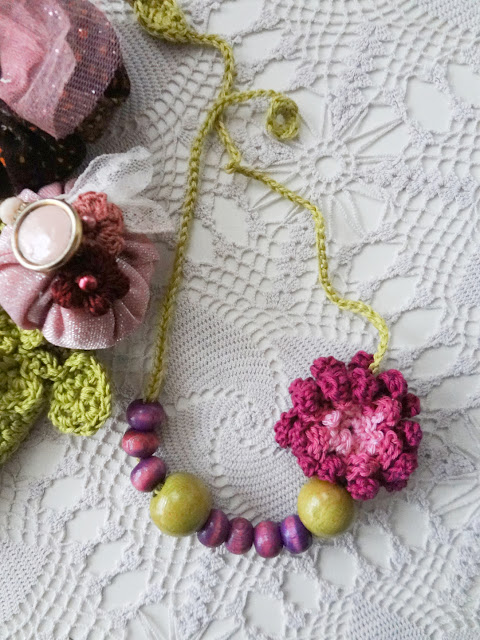
I am always surprised when I am asked to make these simple flower and bead necklaces; but people seem to love them.  
 
If you are keen on such, here's the pattern for this lovely anemone and how I made this necklace.
 
Before we begin, please note that: The written  pattern in its entirety along with the photos are for personal use only. All property rights belong to Maya Kuzman of The Little Treasures.
 
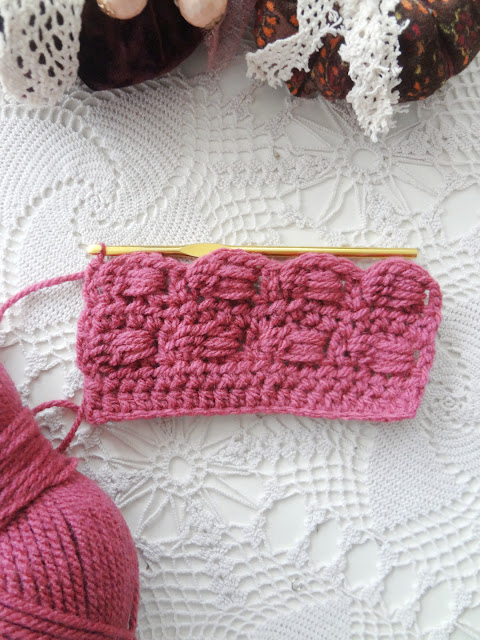
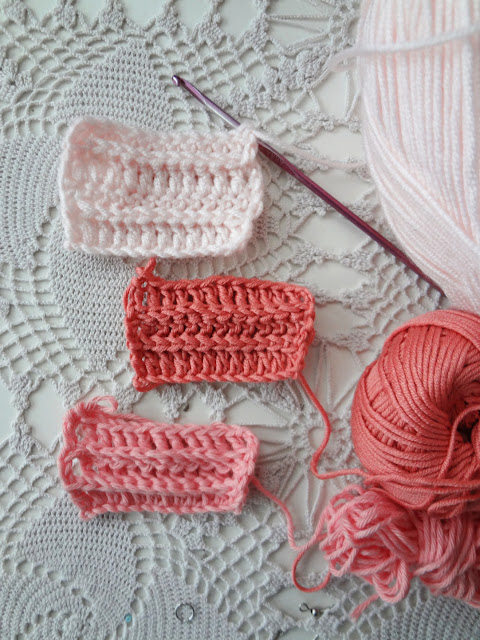
Yarn and hook: sport yarn in 3 colors (Phil Cotton 3) for the anemone, green for the chain, and a 3 mm hook (UK11) (US 10/3). Left over yarn works great for this project.
 
Crochet stitches in American terminology: chain (ch), skip (sk), slip stitch (sl st), single crochet (sc), double crochet (dc).
 
Other: wooden / plastic beads, tapestry needle. 

Measurements of anemone - 6x6 cm (2.36"x2.36")
Length of necklace - maker's choice.   
 
Anemone pattern:
Foundation and round 1: In color one, ch5 and join to make a ring. Sc7 in ring. (7)
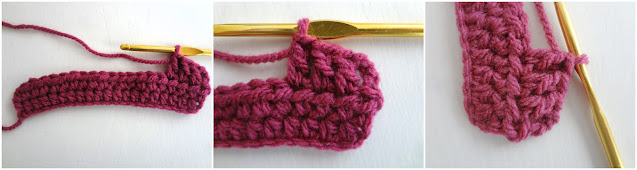
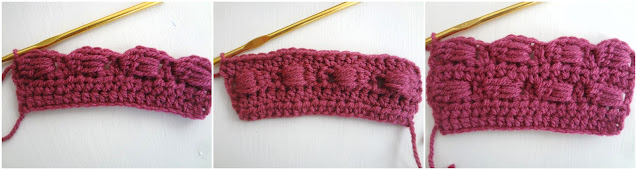
Round 2: Ch3 and starting from 2nd st. from hook, hdc1 in next 2 sts. Sl st into next st., ch3, and starting from 2nd st. from hook, hdc1 in next 2 sts, then sl st in same st. Sl st into next st., and repeat this pattern. Work this pattern around for all 7 stitches. Cut yarn and work the tail.
 

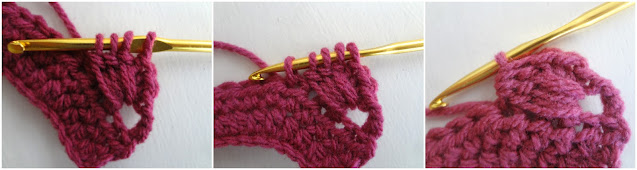
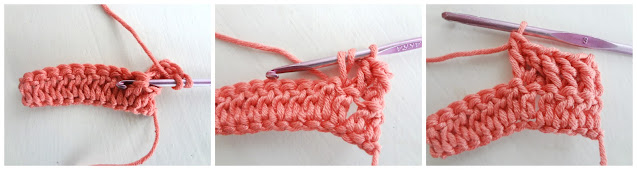
Round 3:  In color two, ch4 and starting from 3rd st. from hook, dc1 in next 2 sts. Sl st at the back, between 2 petals from the previous round. Then repeat this pattern for the round. Cut yarn and work the tail.


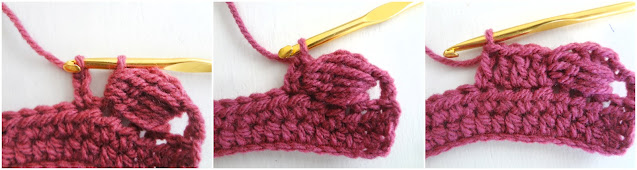
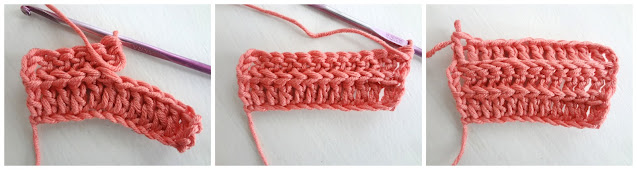
Rounds 4 - 5:  In color three, ch5 and starting from 2nd st. from hook, hdc1 in next 4 sts. Sl st at the back of petal before it and repeat this pattern. This round will have more petals. Do not cut yarn, but when you are done with this round, make another round working the same pattern. When finished with round 5, cut yarn and work the tail. 
 
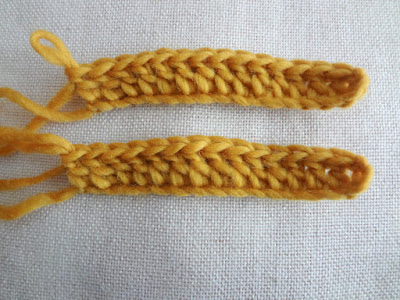
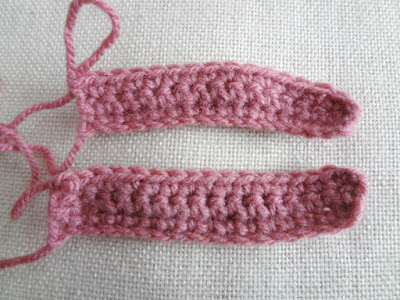
Chain (leaf and loop) pattern: 
 
 
For the leaf in green color, ch8 and starting from the 2nd st. from hook, sl st.1, hdc1, dc1 in next 2 sts., hdc1, sl st 1 in last 2 st. Ch1 and now work the other side of the leaf following the pattern in reverse: sl st 1 in next 2 sts., hdc1, dc1 in next 2 sts., hdc1, sl st1. Next chain 120 (you can chain as much as you want the chain / necklace to be long) and leave about a meter of yarn (mind that you do not pull the last stitch), cut yarn and insert tail through a tapestry needle.

 
Take the anemone and insert needle through the anemone's petals from the back, then string your assortments of beads. Once done, pick up your stitch, and sl st into 6th st from hook to make a loop. Insert leaf through loop to see if it fits nicely because that is actually the closure. If it is OK, sc6 inside that chain / loop, cut yarn and work the tail. If the loop is too small, add a couple of more stitches to that loop. And that is it!
 
 
I hope you like this. If something is ambiguous in the instructions, please ask in the comments.  Happy weekend!
 

Wednesday, January 26, 2022

When Crochet is Art - Astrid Schandy

 
I must admit I was blown away when I first saw Astrid's work! Surely you'd agree this is pure art! I love the bold, striking designs emphasized by the original choice of color.  The proportions and the wonderful, intricate details of her blankets show the true love and effort she'd invested while creating these designs. 
 
Sadly, there is almost no existing information about this Norwegian designer, but you can buy her patterns on ravelry and follow her on instagram


Monday, January 24, 2022

How to Crochet the Basket Weave Pattern

Although an incredible yarn-eater, this pattern is steadily becoming a favourite. 
The basket weave pattern is worked using additions of five. For the sample shown here, I used DK acrylic yarn and a 4mm hook.

The pattern:

Foundation and row 1:(start with a hook size bigger - in this case a 5mm one) ch21, change hook to 4mm,  and starting from 2nd st from hk., hdc1 in all (20). Ch2 and turn work.
Row 2: hdc1 in all (20). Ch3 and turn work. (ch3 counts as a stitch)
Row 3: dc1 in next 3 sts, turn work sideways and make a 3-dc cluster over those 3dcs you made, but do not work it - insert hook into next st, yo and pull up yarn through that stitch and through all 4 stitches on hook.
Insert hook into next st., yo and ch3. This is a bit awkward since the stitch from the basket has to stay on the hook while you are chaining. Next sl st it through that same "basket" st.
Next, dc1 in next 3 sts, and repeat the above basket pattern to the end of row.
 
Row 4: repeat row 2.
Row 5: repeat row 3.
Row 6: (not shown) repeat row 2. 

The texture is quite attractive, and I cannot wait to show you the project I used it for.

Thursday, January 20, 2022

Blooming Crochet Necklace


Fresh off the hook, I present to you my newest layering necklace. It is composed of three different layers: the longest one is made of leaves, the middle one of bobbles and the shortest one of flowers. Put all together they make an interesting and eye-catching piece. 
The pattern is here

Tuesday, January 18, 2022

Why I love the FSDC more than FPDC - crochet stitches

 
In trying to add ridged texture, I first used the front stitch double crochet (FSDC) with these warmers, and became immediately in love with the stitch. 
How to do this stitch and how it is different from the front post double crochet (FPDC)? 
 
 
For the fsdc, you obviously do not work the post, but the actual stitch. You yo, insert the hook up front through the stitch, yo again and dc1. The photos above show the back of the sample, but once you are done working all the stitches, the front gets a nice ridged look (photos below).
For the sample I also used the bsdc (back stitch double crochet) for the next row - it turned out interesting but not as to make me flip out.
 

Now, in the picture above you can see the obvious difference (the lighter color sample was made using FPDC and BPDC). The FSDC makes the stitches amazingly neater and straight(er), while with the FPDC they tend to droop down, thus creating a greater and deeper gap between this and the next row. 

Also the BPDC makes the stitches smaller (picture below), while the BSDC makes them longer. 

All in all, I am intrigued to see how this stitch combines with other textured stitches and I cannot wait to use it more.


Wednesday, January 12, 2022

The Cailleach Capelet


I wanted to see what bobbles would be like in a capelet, and this is how the Cailleach capelet was born.  I must say I love the rich lattice effect it has. Fit for a winter goddess and that is how it got its name. For Cailleach in Gaelic Mythology is a divine hag (old woman) associated with winter, but I like the old Irish meaning of it as "a veiled one", which is an early loan from the Latin word pallium that translates to "a woolen cloak", and that sums it up perfectly. 
 
It's in my shop.
 

Monday, January 10, 2022

The Wabi Sabi Philosophy

Photo Via

Lately, I have been pondering over the wabi-sabi philosophy a lot. Maybe it was triggered by my winter cleaning and refusing to throw objects I have from my grandparents, and although some rusty and some of them chipped, I wished to hold onto them a little bit more, just to have them there to look at and admire.  
 
In traditional Japanese aesthetics, wabi-sabi is centered on the acceptance of transience and imperfection. The aesthetic is sometimes described as one of appreciating beauty that is "imperfect, impermanent, and incomplete" in nature.
 
The word 'wabi' originally referred to the loneliness of living in nature, remote from society; 'sabi' meant "chill", "lean" or "withered". Around the 14th century, these meanings began to change, taking on more positive connotations. 'Wabi' came to connote rustic simplicity, freshness or quietness, and can be applied to both natural and human-made objects as an expression of understated elegance. It can also be used to refer to the quirks and anomalies that arise from the process of making something, which are seen to add uniqueness and elegance to the finished object. 'Sabi' refers to the beauty or serenity that comes with age, when the life of the object and its impermanence are evidenced in its patina and wear, or in any visible repairs. 
 
After centuries of incorporating artistic and Buddhist influences from China, wabi-sabi eventually evolved into a distinctly Japanese ideal. Over time, their meaning  changed to be more lighthearted and hopeful. Around 700 years ago, particularly among the Japanese nobility, understanding emptiness and imperfection was honored as tantamount to the first step to satori, or enlightenment. 
 
In today's Japan, the meaning of wabi-sabi is often condensed to "wisdom in natural simplicity". In art books, it is typically defined as "flawed beauty". 
 
I plan to make a small photo-session with my precious objects and I am already excited about it!


Photo Via


These wondrous hooks are by Sarah from Keble Craft Collective.
Photography by  Sam Macki.

Photo Via

Saturday, January 8, 2022

Crochet tip: How to Make Your Foundation and Work Even

 
Maybe you've noticed that when working on a project (a scarf, blanket, etc). the foundation chain makes the work narrower at the bottom and the following rows just get bigger at the sides and center. 
The trick to make it even is quite simple: Use one hook size bigger for the foundation chain.  
If your project requires - let's say - a 4mm hook, make the foundation chain with a 5mm hook and then switch to 4 mm in the first row. The work will be perfectly aligned. 
 

For the mustard yarn above, the first (top) sample is made with a 4 mm hook for both foundation and row 1, while for the sample below it, I used a bigger hook (5 mm ) for the foundation and then the required hook (4 mm) for row 1. I made dc stitches.

With the pink yarn I applied the same tip with sc stitches and the difference is quite striking. The top part tends to make a kind of an arch over the foundation. The first sample is made with just a 3 mm hook, while for the one below it, I used a 4 mm hook for the foundation and switched to a 3 mm hook for row1.


Do you do this with your foundations? Any tips you could share?

Wednesday, January 5, 2022

Chunky Neck Warmer - free Pattern


For the neck-warmer I had in mind, I wanted to try this Alize Maxi yarn, and I am so happy I did, because it turned out to be the perfect one for this project.
Alize Superlana Maxi is a super bulky weight (100 gr/skein), and it has an amazing velvet feel. The content is 75% Acrylic and 25% wool. 
 
Preferable hook size: 8-10mm hook. 
Gauge: 12dc st. over 10 cm/ 3.93" in first row. 
Crochet stitches in American terminology: chain (ch), skip (sk), slip stitch (sl st), single crochet (sc), double crochet (dc), front post double crochet (fpdc), double crochet back loop only (dcblo), treble (tr).
Measurements of neck-warmer -  Length: 25cm/9.84", width : 42.5cm/16.7"

Before we begin, when you make the foundation chain +row 1, check to see if you like the fit of the warmer around the neck. If you feel it should be bigger, increase the number of foundation stitches, but pay attention to retain that stitch count throughout. Also, please note that: The written  pattern in its entirety along with the photos are for personal use only. All property rights belong to Maya Kuzman of The Little Treasures. You are welcome to sell finished items from this pattern.
 
Pattern:
Foundation and row 1: (for the foundation chain, start with one hook size bigger, in this case 9mm hook) ch45, change to 8mm hook and starting from the 4th st. from chain, dc1 in all (43). Ch3 and turn work.
Row 2: (the ch3 at the end of row counts as a stitch) starting from 2nd st., fpdc1 in all (43). We are going to maintain the same count of stitches throughout, so I will not give the stitch count further. Because the ch3 at the end counts as a stitch, always sk 1st st in the new row. Ch3 and turn work.
Rows 3-10: starting from 2nd st., dcblo1 in all. Ch3 and turn work. 
Round 11: (edging all around the warmer). Ch3 and dc2 in 1st st of that chain (I will refer to this as a "shell"). Next, sk2 (not counting the 1st st) and sc1 in the third st. Repeat this pattern to the end, where you sk3 and sc in the last st. This is the upper side edge pattern. For the side, repeat the same pattern, but after you make the shell, skip the next row and sc in the next. Repeat the pattern, to the end where you don't skip a row but sc in the last row of the side. Next, work the bottom side pattern (same as upper side) and then the side pattern again. Sl st into 1st shell to end round. Cut yarn and work tails. 

Bottom edging extra row: turn the crochet work so that the  bottom is up, and insert yarn into bottom of the first shell. Ch5 and tr2 in first st. of that chain, then sc1 between the shells of the row below. Repeat this pattern to the end of row. Cut yarn and work the tails.
 

Make a long chain - mine is 120 cm long /47.2". Mind to leave a long tail that will be slid through a tapestry needle, so that you weave it through the warmer.

Insert needle into the 7th row (I believe this is ideal, but you can insert the tie where you think would be best for you). Slide through 2 posts below, take needle out, sk2 and slide down again. Repeat this until the chain appears on the other side of the warmer.

Fold the upper edge a little, tie it around and voila! You have a new warmer! 
Write your questions in the comments if you have any.  
The pattern photo tutorial is in my shop.