
All the best to you all, and may 2021 be a lot better than the past year!


I chose the 4 most definitely popular in terms of views and shares: the Bohemian mask, the Boho bracelet, the Foliage shrug, and the Brontë cuff.

My creative pursuit resulted in two collections - the Little Women & the Tropical / Bohemian Home Decor.

Last, but certainly not the least - THANK YOU for following me on my crochet journey, for beautifying my days with your lovely, heartfelt, supportive comments, for being inspirational, encouraging and irreplaceable blog pals one could only wish for!


Here they are!
My fingertips hurt like crazy, but I managed to sew every single bead, and stitching these lovelies was truly worth it. I love them all, but the blue one is my favourite.
The pattern which is in my etsy shop, contains patterns for 6 ornaments (pinwheel, strawberry-shaped bauble, bulb, Chinese lantern, round ornament, diamond).
The
patterns are accompanied by elaborate explanations and descriptions of
how to decorate these ornaments. However, this is purely optional and is
given as inspiration. I kindly invite you to use your imagination, as
well as the materials you have at hand to create unique and eye-catching
ornaments.
I used DK yarn for all of these and a 3mm hook (UK11) (US 10/3) .
Other supplies needed: embroidery floss, sewing thread in color matching the color of the ornament / sequins/beads (preferably), sewing and tapestry needle, filling, glass / pearl, seed (round) beads, sequins, crochet (fabric) flowers, decorative ribbons.
Stitches:
chain (ch), chain space (ch-space), skip (sk), slip stitch (sl st),
single crochet (sc), single crochet 2together (sc2tog), double crochet
(dc), double crochet 2 together (dc2tog), 3-dc puff stitch. American
terminology used.


For the last couple of Christmases, following my daughter's wish, we've been exclusively decorating our Christmas tree in red and golden baubles and ornaments. Honestly, I do like the festive, and a kind of magical atmosphere such decor creates and this year, after all the challenges and insecurities the 2020 brought on our backs, I was looking forward for this calmer, more relaxing and soothing ambience at home.
However, my two extremities started battling - the steady and calm Victorian, and the raging Bohemian gypsy. I couldn't suppress the yelp of the bohemian spirit, so I crocheted various decorations to soothe my boho cravings. I am going to display them in a secluded corner, just for my enjoyment.
Another thing - I have the patterns for these, so do drop back on Monday for the pattern/ tutorial reveal, if interested.
My inspiration board:


I've long wanted to make crochet gnomes to add to our Christmas decorations, but actually never got down to do that, until I took out our felted ones and saw the damages the tooth of time had left on them. I knew now was the time for some fresh ones.
My version is quite simple, since it doesn't have legs and arms. It consists of a body, nose, hat and wool fluff for the beard. You need filling to stuff the body up and a 2.5 mm (diameter) wooden bead, or you can use filling instead of a bead. Also, you will need a sewing / tapestry needle and sewing thread.
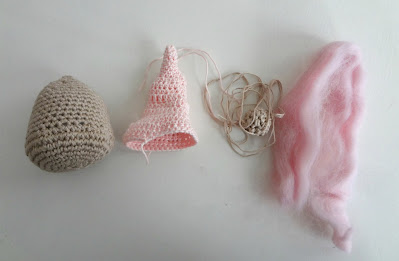
For the gnome's body I used doubled sport yarn and a 3mm hook for the body and a 1.9mm hook and sport yarn for the hat and nose.
Stitches in US crochet terms: chain (ch), single crochet (sc), single crochet 2 together (sc2tog), half double crochet (hdc), half double crochet 2 together (hdc2tog), double crochet (dc).
Pattern for the Gnome's Body
Foundation and rnd1: Ch5 and join to make a ring. Sc6 in ring.
Rnd 2: sc2 in all (12)
Rnd 3: sc2 in all (24)
Rnd 4: sc1 in all (24)
Rnd 5: sc2 in one st., sc2 in next (36)
Rnd 6: repeat rnd 5 (54)
Rnd 7: sc1 in all (54)
Rnd 8: sc1, sc2tog (36)
Rnds 9- 15: sc1 in all (36)
Rnd 16: repeat rnd 8 (24)
Rnds 17-18: sc1 in all (24) You can start stuffing it here .
Rnd 19: repeat rnd 8 (12)
Rnd 20: sc1 in all (12)
Rnd 21- end: sc2tog.

Pattern for the Gnome's Hat (top down)
Foundation and rnd1: Ch4 and join to make a ring. Sc1 in all (4) (you do not single crochet in the ring, but directly into the stitches).
Rnd 2: sc2 in one, sc1 in next st. (6)
Rnd 3: sc1 in all (6)
Rnd 4: repeat rnd 2 (9)
Rnds 5-6: sc1 in all (9)
Rnd 7: sc1 in one st, hdc2 in next, dc1 in next 2 sts., hdc2 in next,sc1 in next four stitches (11)
Rnd 8: sc1 in first stitch, hdc1 in next nine stitches, sc1 in last st. (11)
Rnd 9: hdc1 in first st., hdc2 in next 2 sts.,dc2 in next 4 sts.,hdc2 in next 3 sts.,hdc1 in last st. (20)
Rnd 10: hdc1 in all (20)
Rnd 11: sc1, hdc2tog, dc1 in next 3 sts.,hdc1 in next, hdc2tog three times (16)
Rnd 12: dc1 in all (16)
Rnd 13: hdc2 in one st., hdc1 in next (24)
Rnd 14: dc1 in 8 sts., hdc1 in 8 sts., dc1 in last 8 sts. (24)
Rnd 15: hdc1 in 8 sts.,dc1 in 8 sts.,hdc1 in last 8 sts. (24)
Rnd 16: hdc2 in one st., hdc1 in next (36)
Rnd 17: hdc1 in 3 sts., hdc2 in next (45)
Rnd 18: sc1 in all (45) Leave a long tail, which you'll use to sew the hat to the body.
Pattern for the Gnome's Nose
Foundation and rnd1: Ch5 and join to make a ring. Sc6 in ring.
Rnd 2: sc2 in all (12)
Rnd 3: sc1 in all (12)
Rnd 4: sc2 in one st., sc2 in next (18) Insert bead here.
Rnd 5: sc2tog, sc1 (12)
Rnd 6: sc2tog, sc1 (6) Leave a long tail, which you'll use to sew the nose to the body.

With the body finished, cut a piece of fluff of about 10 cm. Position vertically across body and fold downwards. Bring closer to the top of body and sew the fluff/beard onto it.
Thread the tail of the hat, position in such way to cover the sewn beard part, thread a tapestry needle and sew the hat on. Lastly, thread the tail of the nose and sew it onto the body.Trim beard as per your liking.
I wanted my gnomes to have one of those adorable French-style moustaches, but was too tired to sculpt them, so off you go my moustacheless gnomes!
I hope you have fun making this!


