My youngest niece simply adores my kids' crochet necklaces that she is a proud owner of several and she wears them often, so I decided to surprise her with a couple of rings.
Before I share the pattern, please note that: The
written pattern in its entirety along with the photos are for
personal use only. All property rights belong to Maya Kuzman of The
Little Treasures.
Yarn and hook: sport yarn of
your choice and colors (I love working with Phil Cotton #3 and Tango) and a 1.9
mm hook (UK4) (US 6). Note that you can use whatever yarn
size/ weight (and relevant hook for that weight ) you like/have at hand.
That will only influence the size of your flowers. Hence, smaller
weights will yield tinier flowers, heavier weights will yield bigger
flowers.
Stitches (American terminology): chain (ch), chain space (ch-sp), slip stitch
(sl st), single crochet (sc), half double crochet (hdc), double crochet (dc).
Other: tapestry needle for
weaving ends, sewing needle for sewing the ring, and scissors.
Pattern
Foundation and round 1: In color 1, ch4 and join to make a ring. Sc6 in ring (6).
Round 2: Sl st into next st BUT at the back. Ch5 and sl st into the 1st st of that chain. This is very important: we are next going to single crochet inside that ch(space) we just made, and we are going to do it counter-clockwise. So the petal has to stay in parallel with the center and always facing up. To not let it twist and turn, (with center face up), bring yarn up-front (last picture of collage above) and sc6 inside that ch-sp. Sl st into next st and repeat petal pattern (ch5, sl st in 1st st of that chain, sc6 inside chain).
Continue working the petal pattern around. After the 5th petal, sk the last st and sl st into the 1st one to end round. Do not cut yarn.
Round 3: Ch6, sl st into 1st st of that chain, and then holding chain and yarn as before, sc8 in that ch-sp. Sl st between next 2 petals at the back, ch6 and work the next petal. Repeat pattern to make a total of 5 petals. When done, sl st into 1st one of this round, cut yarn and work tails.
Row 1: Insert green color in-between 2 petals and sc7. Sl st in 2nd st, then sc1, hdc1,dc1 in next 3 sts. One leaf is made. Sl st it between next 2 petals. Again ch7 and repeat the leaf pattern for the second leaf.
Making the ring
Foundation and row 1: Insert green yarn in the stitch of the end of the petal opposite the leaves, and sc1, then sc1 in-between that petal and the next one, and then sc1 in the stitch (beginning) of second petal = 3 sts.
Row 2: ch2 (counts as 1hdc), turn work , sk1, hdc1 in next 2 sts (3).
Rows 3-5: repeat row 2. The length should be sufficient for a kid's finger. For adults, work row 2 until the base-ring part fits on a finger. When appropriate length is achieved, cut yarn leaving a long tail. Thread tail and sew it at the leaves on the other side. Weave tails when done.
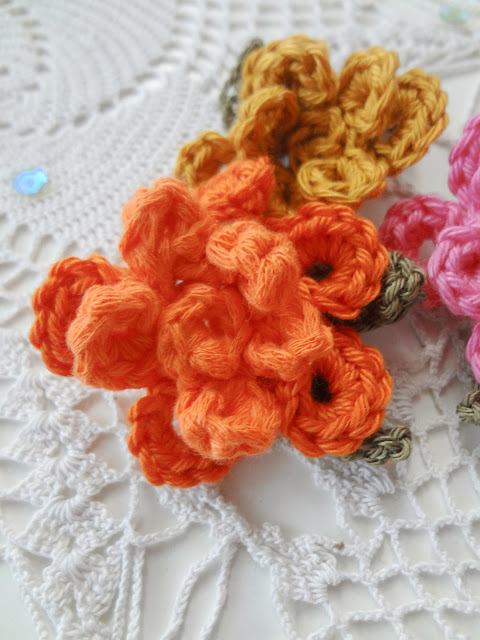
To make these roses more interesting, use 2 shades of the same (or maybe contrasting) color for each round of petals.


5 comments:
Very pretty and unique ring idea. These would also make such lovely napkin rings for Spring and Summer.
Śliczne drobiazgi, dzięki za tutorial.
These flower rings are so cute and unique looking.
You are welcome and Thank you!
Thank you Julie!
Post a Comment