Saturday, December 12, 2020

Crochet Gnome - free pattern


I've long wanted to make crochet gnomes to add to our Christmas decorations, but actually never got down to do that, until I took out our felted ones and saw the damages the tooth of time had left on them. I knew now was the time for some fresh ones.

My version is quite simple, since it doesn't have legs and arms. It consists of a body, nose, hat and wool fluff for the beard. You need filling to stuff the body up and a 2.5 mm (diameter) wooden bead, or you can use filling instead of a bead. Also, you will need a sewing / tapestry needle and sewing thread.
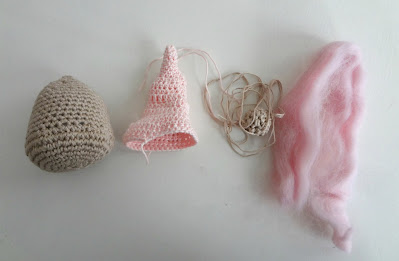
 

For the gnome's body I used doubled sport yarn and a 3mm hook for the body and a 1.9mm hook and sport yarn for the hat and nose. 

Stitches in US crochet terms: chain (ch), single crochet (sc), single crochet 2 together (sc2tog), half double crochet (hdc), half double crochet 2 together (hdc2tog), double crochet (dc).

Pattern for the Gnome's Body

Foundation and rnd1: Ch5 and join to make a ring. Sc6 in ring.                               

Rnd 2: sc2 in all (12)                                                                    

Rnd 3: sc2 in all (24)

Rnd 4: sc1 in all (24)

Rnd 5: sc2 in one st., sc2 in next  (36)

Rnd 6: repeat rnd 5 (54)

Rnd 7: sc1 in all (54)  

Rnd 8: sc1, sc2tog (36)

Rnds 9- 15: sc1 in all (36)

Rnd 16: repeat rnd 8 (24)                                                                                          

Rnds 17-18: sc1 in all (24)  You can start stuffing it here .

Rnd 19:  repeat rnd 8 (12)  

Rnd 20: sc1 in all (12)

Rnd  21- end: sc2tog. 


When you make the first decrease at round 8, it will create dents at the edge, so fill those up quite nicely. Insert fingers inside (or your hook), pop those dents out and fill up. 

Pattern for the Gnome's Hat  (top down)   

Foundation and rnd1: Ch4 and join to make a ring. Sc1 in all (4)  (you do not single crochet in the ring, but directly into the stitches).                          

Rnd 2: sc2 in one, sc1 in next st. (6)                                                                       

Rnd 3: sc1 in all (6)                                                                                                    

Rnd 4: repeat rnd 2 (9)

Rnds 5-6: sc1 in all (9)

Rnd 7: sc1 in one st, hdc2 in next, dc1 in next 2 sts., hdc2 in next,sc1 in next four stitches (11)

Rnd 8: sc1 in first stitch, hdc1 in next nine stitches, sc1 in last st. (11)

Rnd 9: hdc1 in first st., hdc2 in next 2 sts.,dc2 in next 4 sts.,hdc2 in next 3 sts.,hdc1 in last st. (20)

Rnd 10: hdc1 in all (20)

Rnd 11: sc1, hdc2tog, dc1 in next 3 sts.,hdc1 in next, hdc2tog three times (16) 

Rnd 12: dc1 in all (16)

Rnd 13: hdc2 in one st., hdc1 in next (24)  

Rnd 14: dc1 in 8 sts., hdc1 in 8 sts., dc1 in last 8 sts. (24)

Rnd 15: hdc1 in 8 sts.,dc1 in 8 sts.,hdc1 in last 8 sts. (24)  

Rnd 16: hdc2 in one st., hdc1 in next (36)

Rnd 17: hdc1 in 3 sts., hdc2 in next (45)

Rnd 18: sc1 in all (45)       Leave a long tail, which you'll use to sew the hat to the body.                       

Pattern for the Gnome's Nose                        

Foundation and rnd1: Ch5 and join to make a ring. Sc6 in ring.                      

Rnd 2: sc2 in all (12)                                                                                                     

Rnd 3: sc1 in all (12)

Rnd 4: sc2 in one st., sc2 in next (18)   Insert bead here.  

Rnd 5: sc2tog, sc1 (12)                                                                                    

Rnd 6: sc2tog, sc1 (6)   Leave a long tail, which you'll use to sew the nose to the body. 


With the body finished, cut a piece of fluff of about 10 cm. Position vertically across body and fold downwards. Bring closer to the top of body and sew the fluff/beard onto it.      

Thread the tail of the hat, position in such way to cover the sewn beard part, thread a tapestry needle and sew the hat on. Lastly, thread the tail of the nose and sew it onto the body.Trim beard as per your liking.

I wanted my gnomes to have one of those adorable French-style moustaches, but was too tired to sculpt them, so off you go my moustacheless gnomes! 

I hope you have fun making this!                                                                                             


Thursday, December 10, 2020

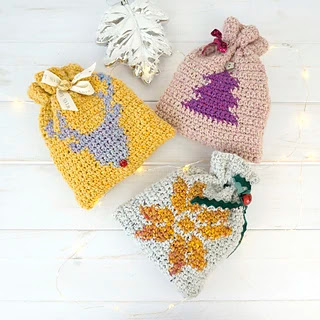
Christmas Inspired Crochet - free patterns

Pattern Via

It has become a sort of tradition here on the blog, for me to compile roundups of Christmas related crochet projects, and this year is no exception. 

When it comes to Christmas ornaments, I am currently finishing some gnomes and baubles, but would love to make a red truck carrying a tree (pattern above) - a wish that has deep roots in the past :). Hopefully, it happens this year? 

Christmas Ornaments

Pattern Via

Pattern Via

Christmas Gift Tags &  Bags

Pattern Via

Pattern Via
 

Home decor (pillows) 


Pattern Via

How about you? Any Christmas crochet going on? 

Monday, December 7, 2020

5 Gift-Wrapping Ideas for Crocheters & Crafters


Happy Monday all!
 
Today I am sharing 5 gift-wrapping ideas you can use for a crocheter/ crafter family member or a friend. I am sure they will appreciate something like this, because it is actually a gift onto a gift :)
So all the wrappings shown here as well as the decorations on them can actually be put to use.  
 
I have mainly focused on yarn decorations, but you can use whatever tickles your fancy (think of all the haberdashery items you might include like ribbons, lace, buttons, stitch markers, thimbles, measuring tape, scissors, glue, beads and sequins, feathers, etc.)
 
The Mini Yarn Skein Bouquet 
 

My personal favourite.
 
For this one you need gift paper and bow, miniature skeins, one biggish skein, toothpicks, satin ribbon, and a piece of paper that'll serve as a scroll. 
1) Roll the big skein into a cylinder and tuck the tail. 
2) Insert toothpicks into the mini skeins and then insert them into the big skein at different levels.
3) Make a bouquet wrapper, slide the big skein in and tie a bow with the ribbon. Insert scroll onto which you previously printed a flower pattern (so that those mini skeins might be put to use). 
4) Glue bouquet onto present.
 
Yarn Rose Decoration
 

To make this style of wrapping, you need a felt piece, satin ribbon, 100 gr/skein and a hook. 
 
 
1) Don't take the label off the skein. Wrap and tie a piece of ribbon really tightly around the label.
2) Next, "peel" the first layer of the yarn down to cover the label. Then peel the next layer down and leave the center intact. Be careful so that you don't ruin the whole skein in doing so. Insert the hook as the rose's stem.
3) Wrap the gift with the felt. Put the gift box in the center of the felt piece, fold all four sides,  add the ribbon, but do not tie it immediately up on the front. First place the rose onto the gift and then, use the rest of the ribbon to tie a bow (over the rose).
 
Frozen - themed wrapping


For this wrapping I used a dotted tulle as the wrapper, wool fluff as the ribbon and a skein of soft and quite thin lamb wool skein. Decorations as per your wish.
1) Wrap the gift with the tulle (the same as with the felt).
2) When wrapping the fluff, slide it through the skein to secure it and tie it softly, because a tight knot will ruin the fluff. Decorate with Christmas ornaments.

 Tulle gift bag with a bow wreath


For this you need a long piece of tulle (mine is 1.5m), yarn bows (DIY tutorial here), a decorative ribbon, and an extra decoration to glam it up.
1) Use the tutorial to make yarn bows and join them with jump rings into a mini wreath. 
2) With the tulle spread out, put gift at the center and fold sides. Then take the bottom side and fold it over to the upper side. Tie the ribbon. Attach the wreath and add (tie / glue) an additional decoration. 

Goodies-filled bag
 
 
Fill a decorative organza bag with goodies your friend might enjoy like ribbons, lace, buttons, beads, sewing thread and needle, etc. Wrap it up with a decorative ribbon.  

I hope you guys like these and use them as a spring-board for many new ideas.
 

Saturday, December 5, 2020

The Gersimi Necklace


I was a fool to believe I could stop with just one necklace. No, no... that just doesn't happen for me. Once I was done with the Freya, the famous itch developed, urging me to make a Freya bracelet. And I was well underway, but the bell flower is actually the culprit of changing my design. It is quite grandiose (I am trying not to use the word "big")  to put on a bracelet, and my aesthetic self couldn't visualize nor let something like that bulging on a tender wrist, so it made the whole thing turn to a necklace.

I chose the name Gersimi for this one, which is the daughter of Freya in Norse mythology, and the name means "treasure". Lots of symbolism here with my blog and vision - just saying :)

Again, aside from the bell flower, I used wooden crocheted beads, my lovely anemones and the ruffled tubes. I am becoming quite attached to those ruffles. 

Another thing is that Freya has another daughter besides Gersimi. Well, you know what that means!


Thursday, December 3, 2020

The Freya Necklace


Today was a dim, gloomy day. One where darkness from the night before lingers on throughout the day and makes everything dreary and bleak. To cheer myself up, I finished this necklace. 

I am quite satisfied how it turned out in the end. The misshaped oval / cylinder was the starting point to which I gradually added the other elements. It resulted from my brainstorming and crocheting ideas for ornaments, and this one was supposed to be filled with filling, so as to emphasize those perky sides, but I quite liked its current shape, so I left it as is. No mistake in doing that, I think. Working on this was a nice break, and I am willing to try something similar soon.