

It has become a custom here on the blog for me to share ideas and patterns for handmade Christmas gifts and this year won't be an exception.

The pattern is for a miniature brooch pin crochet art, as I like to refer to it. The pin is 7 cm long (the crochet beginning is 5 cm) and the crochet pieces are 6-7 cm in length.

They are worked in sport yarn and a 1.9mm hook.
Crochet terms used: chain (ch), slip stitch (sl st), single crochet (sc), half double crochet (hdc), double crochet (dc), treble (tr), picot. American terminology used.
How to crochet on a brooch pin
Crocheting on a brooch pin can be rather challenging and frustrating. The closed part of the brooch and not the needle part is the place where this is crocheted. After you make the initial chain, I recommend you do the rest of the chaining by holding the brooch (at the end of the brooch) as I show in the picture, holding the needle for support while you make the chains. Once done, it is a piece of cake.

Pattern for the red piece
Foundation: Chain 13 on the pin. Turn the work on the other side - away from the needle and close the brooch.
Row 1: Starting from the 2nd st from hook, sc1 in each stitch (12). Ch2 and turn work.
Row 2: Skip 1st st and hdc1 in the next 2st, next dc1 in next 6 sts and hdc1 in the last 3 sts. (12) Ch2 and turn work.
Row 3: Repeat row 2. Ch1 and turn work. (12)
Row4: Sl st in the 1st 2 sts, then dc1 in next 8 and lastly, sl st in the last 2 sts (12). Ch1 and turn work.
Row 5: sl st in 1st st, sc1 in next, hdc1 in third, dc1 in next st, make a 4-ch picot, dc1 in that same stitch, tr1 in next st, make a 4-ch picot and tr once more in that st, dc1 in next st, make a 4-ch picot and dc1 again in that stitch, next, hdc1 in next, sc in the next and end the row with a sl st. That's it. Work tail.

Pattern for the grey piece
Repeat pattern for the red up to the fourth row.
Row 5: sk1, sl st in 2nd st, next dc1 in next 8 sts, sk1 and sl st in last st (10). Ch1 and turn work.
Row 6: sc1 in 1st st, dc1 in next 8 sts and sc1 to end it (10).
Row 7: ch4 and make a picot, sk1 and sc in next. Make a 4-ch picot and sc in next st. Repeat this pattern up to the 7th picot. Make the 8th picot, sk a st and sl st in the last st.
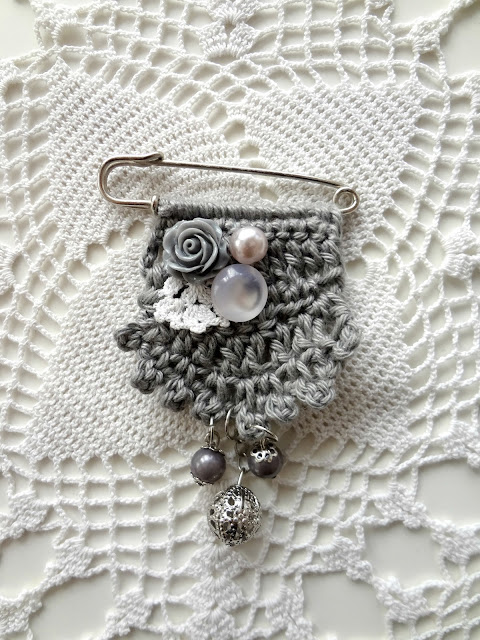
For this one I decorated a corner with a lace piece, a cabochon, a pearl button and a pearl bead. I also decorated the center with pearl and a metal bead.
Pattern for the pink piece
Foundation: Chain 13 on the pin. Turn the work on the other side - away from the needle and close the brooch.
Row 1: Ch 3, sk 2 and sc in next st. Repeat this pattern to the end of row. There should be 4 chain spaces.
Row 2: Ch 2 and hdc2 in the 1st ch -sp. Next, hdc3 in every ch-sp to the end.Row 3: Ch3, sk 3 and sc in next st. Repeat this pattern to the end of row. There should be 3 chain spaces. Ch1 and turn work.
Row 4: In all ch-spaces work the following: hdc1, dc1, hdc1.
Row 5: Ch11 and sl st in the last st.
Row 6: Ch3 and sc (over the chain of row 5) in the dc of the 1st ch-space. Ch 3 and repeat the sc for the second dc of row4 and lastly, chain 3 and sc in the last st. Ch 1 and turn work.
Row 7: dc1, make a 4-ch picot, dc1 once more in that chain space. Repeat this patter for the other 2 chain spaces. Sl st to end row.

I
decorated it with a cabochon centered daisy under which I sewed pearl disc beads. I added a pearl bead on the center picot.
I hope you get inspired to make some yourself.


You can download a free copy of the Art Brooches from ravelry.

This pattern also comes as a complimentary (gift) pattern with my Thumbelina pendant necklaces and using the code XMAS2019 for a 25% discount, you can get both for a bargain.
13 comments:
How pretty your little brooches are, Maya. I love all the exquisite embellishments you have added. So very kind of you to share your magic and the 'how-to" with us.
Thank you Kim! After crocheting them, the embellishment phase is the one I'm most excited about.
Love the idea of flag style crochet pins - they would work very well as gifts or favours even at a party.
Maya, your brooches are so pretty! I like the idea of the brooch pin. Thank you for sharing.
These are sooo pretty - should have made one of these (I do have those pins in the studio) instead of crochet and frogging, crochet and frogging, crochet an frogging all evening...
I love these so much. Actually saw a beaded version a long while back and thought it would be a great idea to do in crochet. I wrote it down in my little project book, bought some big safety pins which I can't find now, and of course, never followed through with making anything. Yours are so very pretty. Thanks for sharing and inspiring!
You made such pretty crochet pins. I love the colored yarn and the beads.
So good.
Maya, your crochet work is always so beautiful. Just love these pretty crochet pins!
Thank you Marie! Mich obliged!
What charming and oh, so gorgeous brooches. Thank you so much for developing and especially for sharing. Just hope I get around to making some of these...and soon!!
I really like these a lot. You are very creative and I thank you for sharing everything that you share!
My pleasure Tracy! Thank you for the wonderful comment!
Post a Comment